In this tutorial you will learn how to add Metadata in Adobe Bridge. As our collections of images grows, we have to embed information about in image in the file itself. This information generally refers to its metadata and some metadata is actually added automatically for example when we use a digital camera to capture an image, the camera manufactures includes information such as a lens that was used or the location spot. We can also add our own information in the file within a minutes.
Lets take a look for adding Metadata in Adobe Bridge. In Adobe Bridge the best way to see Metadata of single image as well as bulk of images is via Metadata panel. If we want to see more information, first we choose any image from the main page and then double click on the Preview in order to minimize this panel.
 When we minimize the Preview Box we see that there are more option coming up below Metadata section including
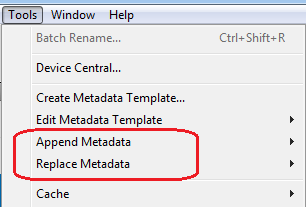 All these features are used to add Metadata in Adobe Bridge and you can easily customize your desired image metadata and keywords. If you want to add some more information about your image then Go to Tools > Append Metadata or chose Replace the Metadata. The difference is if you already had some Metadata as signed in your image and you just want to add more Metadata to it you can use Append Metadata. For example if you already add some Metadata and copyright information of your image but you want to add secondary information about your image like where to use this image, resolution of image or you add a caption then we use Append Metadata tool. Or if you already done with Metadata but want to replace some values then use Replace Metadata Tool.
This is how you add Metadata in Adobe Bridge for your personal blogs, clients websites or in your projects.
All these features are used to add Metadata in Adobe Bridge and you can easily customize your desired image metadata and keywords. If you want to add some more information about your image then Go to Tools > Append Metadata or chose Replace the Metadata. The difference is if you already had some Metadata as signed in your image and you just want to add more Metadata to it you can use Append Metadata. For example if you already add some Metadata and copyright information of your image but you want to add secondary information about your image like where to use this image, resolution of image or you add a caption then we use Append Metadata tool. Or if you already done with Metadata but want to replace some values then use Replace Metadata Tool.
This is how you add Metadata in Adobe Bridge for your personal blogs, clients websites or in your projects.
Tools used to add Metadata in Adobe Bridge
When we minimize the Preview Box we see that there are more option coming up below Metadata section including
- File property
- IPTC Core
- IPTC Extension
- Camera Date
- GPS
- Camera Raw
- Audio
- Video
- Dicom
All these features are used to add Metadata in Adobe Bridge and you can easily customize your desired image metadata and keywords. If you want to add some more information about your image then Go to Tools > Append Metadata or chose Replace the Metadata. The difference is if you already had some Metadata as signed in your image and you just want to add more Metadata to it you can use Append Metadata. For example if you already add some Metadata and copyright information of your image but you want to add secondary information about your image like where to use this image, resolution of image or you add a caption then we use Append Metadata tool. Or if you already done with Metadata but want to replace some values then use Replace Metadata Tool.
This is how you add Metadata in Adobe Bridge for your personal blogs, clients websites or in your projects.
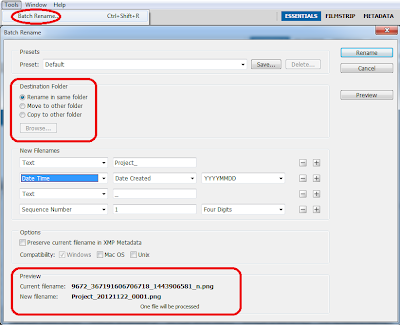 In the Batch Rename dialogue box you will notice, you see lots of customizable options like Rename in the same folder, move to other folder and copy to other folder. In order to give new Filenames of your images you can use vareity different options as your requirment. You can edit
 If we move this slider right or left side we see the images placed in main page will become expand or shorten. You can resize the images and drag and drop down according to your choice. The thumbnail of images will become larger or can be drag and drop as you wish.
There is also an icon in each side of the slider to do this action with ease. Is you are keyword junkie then use cmd + minus sign on mac and for window use ctrl + minus sign (-) to make your thumbnails smaller or in order to make your thumbnail larger use ctrl + plus sign (+) on windows and for mac use cmd + plus sign as a command line.
So now after customize the size of our thumbnails, what about the content under neath the thumbnails. So is you want to put more information about each image on the main page of your Adobe Bridge, we can use our preferences. You can do this by going toolbar and click Adobe Bridge , Click the drop down and select Preferences on windows. The keyword shortcut for this is cmd + k on mac and ctrl + k for windows.
When we open Preferences, another page will open look like the image below.
If we move this slider right or left side we see the images placed in main page will become expand or shorten. You can resize the images and drag and drop down according to your choice. The thumbnail of images will become larger or can be drag and drop as you wish.
There is also an icon in each side of the slider to do this action with ease. Is you are keyword junkie then use cmd + minus sign on mac and for window use ctrl + minus sign (-) to make your thumbnails smaller or in order to make your thumbnail larger use ctrl + plus sign (+) on windows and for mac use cmd + plus sign as a command line.
So now after customize the size of our thumbnails, what about the content under neath the thumbnails. So is you want to put more information about each image on the main page of your Adobe Bridge, we can use our preferences. You can do this by going toolbar and click Adobe Bridge , Click the drop down and select Preferences on windows. The keyword shortcut for this is cmd + k on mac and ctrl + k for windows.
When we open Preferences, another page will open look like the image below.
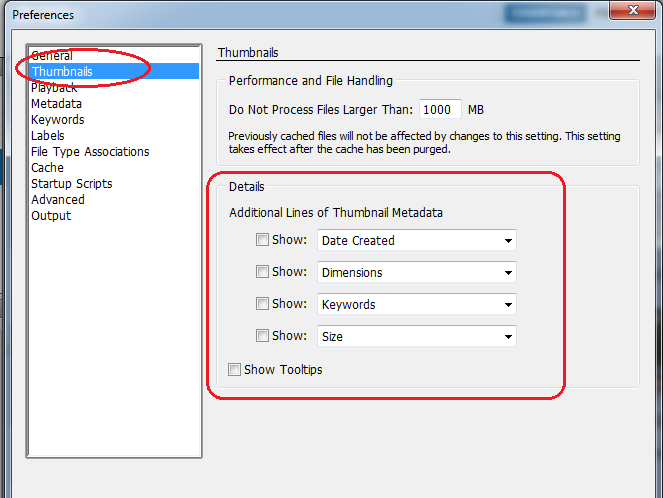 The second choice is Thumbnail click and open it. Now we have more choices here. You can add metadata of thumbnails, size of description underneath the thumbnails, edit the dimensions and keyword for this image. Use these option according to your choice.